31 October 2011


Today I am sharing with you one of my favorite slow cooker dishes.  It's chicken with a peanut-sesame sauce.  So tasty.  It's also one of those "take a little help from the store" meals, because it uses bottled dressing.  It's kind of like a Thai version of my Slow Cooker Italian Chicken and Vermicelli.  I got this recipe from Allrecipes.


Slow Cooker Easy Thai Chicken

Ingredients:
1 cup Kraft Asian Toasted Sesame Dressing
1 tsp Thai chile paste
1 tbsp ginger , grated
1 clove garlic, grated
2 tbsp peanut butter
4 chicken breast cutlets
1 tbsp cornstarch, optional


Directions:
Stir together the salad dressing, Thai chile paste, ginger, garlic, and peanut butter in a bowl until the mixture is well combined.  Place the chicken into the slow cooker. Pour the sauce over the chicken, turning to coat.


Cook on low, 4 to 6 hours, until the chicken is very tender.


If desired, pour cooking liquid out of slow cooker and into a small saucepan.  Add cornstarch and bring to a boil until it thickens to desired consistency.


Serve over white rice and steamed matchstick carrots; drizzle with sauce.


Makes 4 servings.

Really couldn't be easier.  Don't worry if you don't have chili paste; I didn't have any the last time I made it, so  I used Thai style chili sauce instead.  You could even just add a little bit of red pepper flakes if you want.  It really isn't that spicy, so if you like things hot, I would suggest adding some red pepper flakes.

You can also use any cut of chicken you like.  If you have some drumsticks to use up, that would be fine. Just remember that bone-in chicken takes longer to cook than boneless.

I  have had trouble finding that particular variety of bottled dressing before.  Meijer doesn't seem to carry it anymore, but I found it at a different store.  So you might have to look around for it.  But it's totally worth it.  Kraft has a product locator on their website if you need help finding it.

My three-year-old loves this meal.  She gobbled it all down and asked for more! 


Pin It

29 October 2011


I'm taking a break from writing about food today to write about Christmas cards.  Christmas is less than two months away and I am already thinking about what to do for our cards.  Last year I had to wait until the last minute to take a picture for our photo card, because my husband gave my daughter the worst bang trim in history in November!  I had to wait for her bangs to grow out some so I could even them out.  Sounds funny now; but believe me, it was NOT funny then!  So I would like to get an earlier start on my cards this year so I'm not scrambling on December 14th like last year.

Have you checked out the holiday card collection at Shutterfly?  I have never used Shutterfly for holiday cards before, but I've been looking at their collection and they have some beautiful cards.  They actually have a much better selection than the place where I have ordered mine in the past.  They have over 900 designs, with categories like Classic, Contemporary, and Whimsy.  You can also filter the designs by how many photos you want on the front and if you want a religious theme or not.  My favorite designs are the simpler ones like the "Starlight Snowflakes" card above.  I think that card would be really cute with a picture of both of my girls together.

Shutterfly is offering bloggers 25 free cards for posting about their holiday cards.  What a great deal!  If you are interested in participating, go here to register.  You have to register by November 11 to be eligible.

While Shutterfly has an amazing collection of holiday cards, they have lots of other photo products as well.  You can create your own 2012 calendar, you can order personalized gift tags, you can make adorable photo books to give as gifts for family, and if you're looking for more gift ideas, they have a plethora of other photo gifts, like mugs, blankets, playing cards, etc.

If you're not quite ready to think about Christmas cards yet, Shutterfly is having a Halloween sale right now on  many of their photo products. Items are up to 50% off with free shipping.   It ends November 3, so check it out now!

Shutterfly offered me 25 free cards to share this promotion with you.  All opinions expressed are completely my own.  I really do think these cards are awesome!


28 October 2011


Now that my daughter is in preschool, I have a new culinary responsibility: preschool snacks.  These bars are what I made for the first time I took snacks to preschool.  They are a variation of a Martha Stewart recipe I saw somewhere.  They have the same basic idea as Rice Krispy treats, except that they are made with Cheerios and contain dried fruit.  I also added sliced almonds to mine. Online cooking schools
are available for those of you who also love cooking yummy things like
these cereal bars.


Fruit and Oat Cereal Bars


Ingredients:
Nonstick cooking spray
2 tbsp butter
1 bag (10 oz.) marshmallows
Dash of salt
6 cups toasted oat cereal
1 cup dried fruit
½ cup sliced almonds


Directions:
Spray a rimmed baking sheet with waxed paper; spray paper with cooking spray, and set aside.


In a large saucepan, melt butter over medium heat. Add marshmallows and salt; cook, stirring occasionally, until marshmallows have melted, about 5 minutes. Remove from heat, and stir in cereal, dried fruit, and almonds.


Immediately transfer mixture to prepared baking sheet. Using a spatula (or your fingers) coated with cooking spray, press in quickly and firmly. Let cool, about 1 hour; cut into 24 bars (3 rows lengthwise by 8 rows crosswise).


Makes 24 servings.

Is it just me, or does using Cheerios instead of Rice Krispies make it healthier?  I think oat cereal is healthier than rice cereal.  Anyway, these are really good and the preschool teacher reported that the kids liked them. Yay!

The great thing about these bars is that you can use any kind of dried fruit you have on hand.  The original recipe called for dried cranberries, and while I love dried cranberries and I'm sure that would be really good,  I had some dried apricots in my pantry that I had no use for and needed to use up.  I really liked the little bits of chewiness they provided.  I added the sliced almonds for a little extra crunch.


This is a good recipe to know.  Cereal, marshmallows, and some kind of dried fruit (even raisins) are pretty standard pantry staples, so you can easily throw something together in case, at 9:00 at night, you suddenly remember that you are supposed to bring snacks the next day.  I'm sure that will happen to me at some point!


Pin It

27 October 2011


This is kind an unusual recipe, but it's fun.  It's a recipe for making sandwiches in the slow cooker.  I don't mean "sandwich filling", I mean the entire sandwich, bread and all!  Kind of like grilled cheese sandwiches with deli meat in them.  It's certainly not the best way to make a sandwich, but it's fun to try.  I saw this recipe on the Crock Pot Recipe Exchange blog.  Here's my adaptation.


Slow Cooker Sandwiches


Ingredients:
1 round loaf of a hearty bread
8 slices of cheese
8 slices of deli meat
Condiments


Directions:
Slice the bread if it didn’t come that way from the store. You should get enough slices to make 4 sandwiches out of it.


Start stuffing the loaf with the cheese and meat. Start in the center and stuff every other slice.  Make sure the cheese is touching the bread, not the meat.  So each sandwich will be bread-cheese-meat-cheese-bread. 


Wrap the loaf tightly in parchment paper (or foil).  Then wrap it again in foil.


Place a small glass or ceramic dish upside down in a 6 qt. slow cooker.  Add ½ cup of water to slow cooker. Place the wrapped sandwich loaf on top of the upside down dish and put the lid on the slow cooker.  Turn to low and cook for 6 hours.


Once it is done, remove the sandwich loaf from the slow cooker.  Unwrap it and lay the individual sandwiches on a cooling rack.  If desired, place sandwiches in a toaster oven to crisp up the bread.  Add any condiments you like.


Makes 4 sandwiches.

Now, obviously, in the picture above, I did crisp up my bread in the toaster oven.  You don't have to do this step.  I wouldn't say that the bread was soggy when I unwrapped it, but it was really super soft and kind of "moist".  Laying the sandwiches out on a cooling rack helped a lot and actually we ate ours that way for dinner that night.  There was one sandwich leftover, and so the next day I heated it up in the toaster oven and that's the one in the pic above.

The benefit to using parchment as the first layer of wrapping is that the cheese won't stick to it as much as it will to foil.  I was out of parchment, so I used foil.  The cheese did stick a little bit, but it wasn't too bad.

Here are a few pictures of the process.


 The loaf stuffed and ready to be wrapped.  I got a loaf of sourdough that was already pre-sliced.  The original recipe said to slice it yourself, and not slice it all the way through, leaving a little bit at the bottom still attached.  I didn't really see the point in that, and I think it would be more of a hassle to finish slicing it after it was cooked and softer.  So go ahead and buy the pre-sliced stuff if you want.

For my sandwiches, I used turkey and thin slices of havarti cheese.


 Wrapped and in the crock.  The loaf sits on a little upside-down dish to keep it out of the water.


The loaf after cooking.

I served these sandwiches with my Bleu Cheese Tomato Soup.  Perfect soup and sammie meal!

Like I said above, it's not the most efficient way to make sandwiches, it's probably a lot easier to just make them on the stovetop, but it's kind of fun to make them in the slow cooker.


Pin It

24 October 2011


Have you seen that new show, The Chew?  It's on ABC during the day.  We don't have the tv on during the day, but I dvr it and watch it after the kids go to bed.  It's not your usual daytime talk show; almost every single segment is about food, usually one of the hosts preparing a dish right in front of the audience.  And you know the food is good because two of the hosts are Food Network Iron Chefs!  They make about 4-5 recipes per show and the segments that are not directly about food involve table centerpieces and other tips for entertaining.  I really enjoy it.  The other day, one of the hosts, Michael Symon, made a tomato soup with bleu cheese and hot sauce.  I love the canned tomato soup, but had never made it from scratch before.  But the idea of adding bleu cheese to tomato soup had me very intrigued.  I had my husband pick up some bleu cheese the next day so I could try it out.  I left out the hot sauce because I didn't want it spicy.  I also made mine creamier by stirring the Greek yogurt into the soup instead of just using it as a garnish.  Here's my version.


Bleu Cheese Tomato Soup


Ingredients
2 tbsp olive oil
1 tbsp Italian seasoning
1 medium onion, chopped
4 cloves garlic, minced
2 (15 oz.) cans diced tomatoes with their juice
1½ cups chicken broth
½ cup bleu cheese, crumbled
1-2 tbsp Greek yogurt, plus more for garnish
Croutons, for garnish


Directions:
Heat the olive oil in a soup pot over medium heat. When the oil is hot, add the onion and sweat for 2 minutes. Add the Italian seasoning and the garlic and continue to sweat for 2 more minutes. Add the tomatoes, their juice, and the broth and bring to a simmer. Simmer for 10-15 minutes.


Add the blue cheese, then puree using either a stick blender or a regular blender in batches.  Stir in the Greek yogurt.  Taste and add salt if necessary.  


Serve with an extra dollop of Greek yogurt and croutons.


Makes 4-6 servings.

Oh man, this was so good!  I know that bleu cheese is one of those "love it or hate it" kind of ingredients,  so if you're not a fan you probably won't like this soup.  But I love it.  My husband liked it okay, but said it was a little "bitey" for him.  Canned tomatoes can be very acidic, so you can add a pinch or two of sugar to tone down the acidity if you need to.  I think that would have helped.  But I loved it as it was.  I ate so much of it that I got raging heartburn later that night!  It was so worth it though.

I served this soup with some sandwiches I made in the slow cooker.  I'll blog about them later this week.  It was the perfect soup and sammie meal.  


Pin It
Shared at:


22 October 2011


I have been awarded another blogging award!  Actually, I've received it twice.  First, from Lisa at Lisa's Dinnertime Dish, and then from Jenna at Newlyweds Blog.  I have seen this award several times on other blogs, so I am honored to have been awarded it.  Thanks so much, Lisa and Jenna!  Please go check out their blogs; they have some great stuff!

So apparently the rules of this award include making a list of seven things you may not know about me.  This wasn't easy for me, as I am really pretty boring!  But I did finally come up with seven things to share with you.


  1. I am a stay-at-home mom to two precious little girls.

Carolena (we call her Lena) is three and a half.  She is a total clown, doing anything for a laugh.  She's my blond-haired, blue-eyed beauty.

 Eva is 16 months old.  She is my little cuddle bug, still burying her face in the crook of my neck to fall asleep every night.  She is my dark-haired, dark-eyed beauty.

 Even though my girls look nothing alike, they are the best sisters to each other.  Nobody can make Eva laugh like Lena can and Lena loves on Eva all day long, giving her sweet hugs and kisses.

2. I am a pastor's wife.  My husband, Jim, is the pastor of a very small church in the Lutheran Church-Missouri Synod.  


3.  I have a Master's Degree.  That I really don't like talking about.  Enough said.

4.  I am an avid St. Louis Cardinals fan, which you have probably picked up on by now if you are a Facebook fan.  My husband and I spent three years in St. Louis while he attended seminary and I attended grad school.  I never gave two poops about sports before moving there, but St. Louis is a huge baseball town so you can't help but get caught up in it.  I will now be a Cardinals fan for the rest of my life, and have converted several friends and family members who have no connection to St. Louis!  Even though we moved away from St. Louis four and a half years ago, we've been able to make it to a Cardinals game once a year since.  We've seen them play in Houston, Detroit, Chicago, and Milwaukee.  I am really excited right now because the Cardinals are playing in the World Series for the THIRD time since I became a fan in 2004.

5.  If you sometimes think the food pics on my blog aren't very good, you are right.  However, I think they are pretty good considering what I am working with: a seven-year-old point and shoot whose button periodically falls off and is literally being held together with electrical tape.  If there was some way I could take a picture of my own camera, I would show you!  Donations are gladly being accepted to the "Lesa Needs A New Camera" Fund. ;)

6.  While I enjoy fall, I absolutely despise winter.  It's gotten a little bit worse every year, now to the point where I battle some winter depression.  If you look at my archives from last winter, you will notice there are almost no blog posts between December and March.  I have gotten much more serious about blogging this year, so I am going to try really hard to not fall into that pit again this winter.  If you notice that you haven't heard from me for a while, write on my Facebook wall or shoot me an email and ask what I've been cooking lately.  Those little bits of encouragement will help a lot!

7.  I have mentioned before that I only make dessert one night a week.  I do it on Thursday nights, and that's for a couple of reasons.  One is that since my husband works on Sundays, Fridays are his days off.  So Thursday night for us is like Friday night for most other people.  It's also because almost all of our favorite tv shows are on Thursday night (The Office, Parks and Rec, and 30 Rock), so we put the kiddos to bed, serve up our yummy dessert, and fire up the DVR.  Yep, that's right, our kids don't get dessert.  They are still young enough now that they don't know what they are missing.

I know that this award has really been making the rounds lately, and I want to give it to some bloggers who haven't gotten it yet.  So here is the list.  If I have given it to you, and you've: 1. already received it  or 2. aren't into the whole "award" thing, I apologize.  Just know that your blog is one of my favorites.  In alphabetical order:


Of course, there are many more blogs which I love but I couldn't list them all!


Since it's finally gotten chilly here in Michigan, I felt like pulling out my slow cooker and making a warm and comforting dish.  This is an adaptation of an EatingWell recipe.  It was originally meant for the oven, but I adapted it for the slow cooker.


Slow Cooker Chicken Tzimmes


Ingredients:
9 cups butternut squash, peeled and cut into 1” cubes
1 cup small pitted prunes, chopped
3 cloves garlic, minced
¼ large onion, chopped (or 2 shallots)
1½ tsp ground cinnamon
2 tsp dried oregano
2 tsp dried thyme
1 tsp salt, divided
2 chicken leg quarters, skinned and trimmed of fat
1 cup reduced-sodium chicken broth
1 tsp orange zest
¼ cup orange juice
2 tbsp brown sugar


Directions:
Place squash, prunes, garlic, onion, cinnamon, oregano, thyme, and ½ tsp salt in a 6 qt. slow cooker and mix well.  Sprinkle chicken with the remaining ½ tsp salt and place on top of the vegetables. Mix broth, orange zest, juice and brown sugar in a small bowl and pour over the chicken.


Cover and cook on low for about 8 hours.


Makes 4 servings.

Tzimmes is pronounced "tsim-iss".  This is a dish often served during the Jewish New Year.  I have no idea when that is, and I'm not Jewish, but I just saw the recipe and thought it sounded good.

Whenever I see a recipe that is supposed to cook in the oven for over an hour (an hour and 40 minutes in this case), I automatically think it would be perfect for the slow cooker.  This recipe couldn't have been easier to adapt for the slow cooker.

The original recipe called for bone-in chicken thighs, but I had a bunch of leg quarters in the freezer that I had gotten on really good sale earlier this year.  They worked perfectly in this dish.  The chicken was tender enough that the joints came right apart and it was easily made into 4 servings that way.

It is important to keep your butternut squash chunks quite large in this recipe.  Since it cooks for 8 hours, if they were any smaller, they would be total mush by the end.  I have this weird tendency to chop veggies smaller and smaller as I go, so I actually got out my kitchen ruler (yes, I keep a ruler in the kitchen for situations like this!) and made sure they were all about one inch.

My mom was visiting when I made this and she loved it.  This is a warm, comforting meal with warm spices that is perfect for the fall and winter.  


Pin It

21 October 2011


Like I mentioned yesterday, I have been cooking/baking with pumpkin a lot lately.  In fact, pumpkin puree actually made an appearance in one of my dreams the other night!  Yes, I have a problem.  No, I'm not going to fix it because I love cooking and baking with pumpkin this time of year.

I mentioned on Facebook the other day that I made two different pumpkin muffins in three days last weekend.  I posted the savory ones yesterday, and here are the sweet ones.  I saw a recipe for Pumpkin Chocolate Chip Muffins in a Penzey's catalog last fall.  I'm not really a big fan of the pumpkin/chocolate combo, but I remembered seeing cinnamon chips the last time I was in the baking aisle at the grocery store.  So I made them using cinnamon chips and they are awesome.  They use a combination of oil and applesauce and that combined with all the pumpkin, means that these are some of the most moist muffins you'll ever have.


Pumpkin Cinnamon Chip Muffins


Ingredients:
1 cup sugar
3 tbsp vegetable oil
3 tbsp applesauce
2 small eggs
¾ tsp vanilla
¼ cup milk
1 cup pumpkin puree
1¼ cup+2 tbsp flour
½ tsp salt
¼ tsp baking soda
1 tsp pumpkin pie spice
½ cup cinnamon chips


Directions:
Preheat oven to 350°.  Coat a 12 cup muffin tin with baking spray.


In a mixing bowl, beat together the sugar, oil, applesauce, eggs, vanilla, milk, and pumpkin until thoroughly blended.  In a separate bowl, sift together the flour, salt, baking soda, and pumpkin pie spice.  Gradually add the dry ingredients to the wet ingredients and stir until just blended, being careful not to overmix.  Gently fold in the cinnamon chips. 


Spoon the batter into the muffin tins.  Bake for 20 minutes until springy and brown or until a cake tester comes out clean.


Makes 12 muffins.

You'll notice that some of the measurements are kind of funky.  It's because the original recipe made 2 dozen plus muffins, but I really prefer my muffin recipes to make one dozen.  That way they can be easily changed to make 2, 3, or 4 dozen without giving yourself a headache doing the math.  The recipe for the 2 dozen called for 3 eggs.  So if you're only making one dozen, use 2 small eggs, but if you're making 2 dozen, just use 3 large ones. Does that make sense?  The flour amount is kind of funny too, but oh well!

I have made these muffins for church twice now and they are always a big hit.

Have you ever used those Hershey's Cinnamon Chips? They are really good.  Heads up, they can be hard to find.  My mom lives in Indiana, and the only store she could find them at was Meijer.  Hershey's has a Hard to Find Product Locator on their website if you are having trouble finding them in your area.


Pin It

20 October 2011


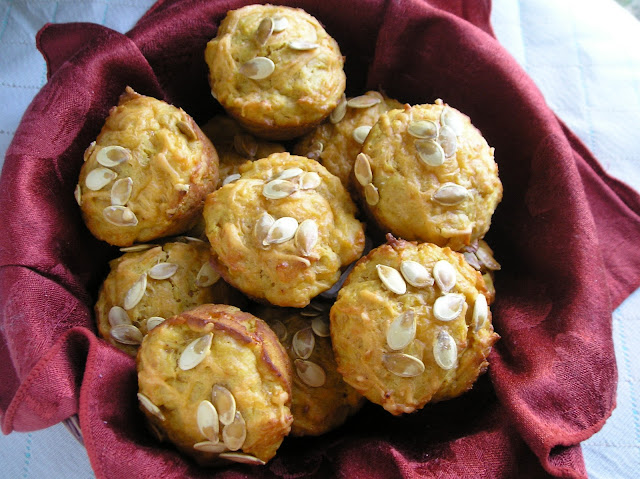
Pumpkin and cheddar?  What a weird combo, you may be thinking.  I love making pumpkin recipes this time of year, and I don't limit myself to only sweet things.  Remember my Pumpkin Alfredo Sauce?  Yum.  I saw this recipe on a blog last week and had to try it.  I originally saw it on The Cookin' Chemist, but she didn't post the recipe (it was part of some baking challenge), but after a bit of clicking on various links, I finally found the recipe on Chocolate and Chakra.  I made these to go with my Gnocchi, Sausage, and Spinach Soup.


Pumpkin Cheddar Muffins

Ingredients:
1 cup pumpkin puree
3 tbsp sour cream
2 eggs
½ cup canola oil
2 cups flour
1½ tsp baking powder
¼ tsp chili powder
1½ tsp salt
¼ cup brown sugar
1½ cups cheddar cheese, shredded, divided
2 tbsp roasted pumpkin seeds


Directions:
Preheat oven to 400°. Coat a 12-cup muffin pan with baking spray.


In a large bowl, whisk together the pumpkin and sour cream. Add the eggs and oil and whisk until combined.


In another bowl, whisk together the flour, baking powder, chili powder, salt, and brown sugar.


Pour the wet ingredients into the dry, and fold until just combined. Fold in 1¼ cups of the cheese.  Divide the batter among the muffin cups. Sprinkle the remaining cheddar and the pumpkin seeds on top of the muffins. 


Bake for 20 minutes, or until golden brown. Let the muffin pan cool on a rack for 10 minutes before turning out the muffins. Serve them warm. 


Makes 12 muffins.

So I thought this was going to be a strictly savory muffin, but then I saw that the original recipe called for 1/2 cup brown sugar.  I went back and reread the blog post and it mentioned that the muffins were a combo of salty and sweet.  I was scared to add too much brown sugar, so I cut it in half.  That turned out perfectly.  They are still savory muffins, but the brown sugar just kind of brings out the pumpkin flavor even more.  Know what I mean?

Oh my gosh, they are so good.  We downed a bunch at dinner that night, then I had the leftovers for breakfast the next two mornings.  (I suggest removing the pumpkin seeds from the leftovers, because once they are sealed up in a bag with the moist muffins they get kind of chewy.)

If you want some awesome recipes for roasted pumpkin seeds, check out this post at Not Rachael Ray.  She has 8 awesome ways to make roasted pumpkin seeds.  I used the Traditional one for this recipe though.

I'm thinking of making these muffins for the Reformation Day dinner at church next weekend.


Pin It
Shared at:

This recipe was picked as a favorite by Jennifer at Jane Deere!


19 October 2011


It is most definitely soup season here in Michigan.  Cold, rainy, windy weather makes me want to stay inside and make soup. I have a feeling we are going to be eating a lot of soup this winter; over the summer I bought two large soup cookbooks.  I haven't made any of those recipes yet, but I saw one at Cinnamon, Spice, and Everything Nice and I moved it to the top of my list!  Here is my adaptation.


Gnocchi, Sausage, and Spinach Soup


Ingredients:
½ large onion, diced
1 tbsp olive oil
1 lb. ground Italian sausage
4 cloves garlic, minced
1 tsp Italian seasoning
4 cups low-sodium chicken broth
⅓ cup frozen spinach, thawed and squeezed dry
1 lb. gnocchi


Directions:
In a large soup pot saute onion in olive oil over medium-low heat until tender. In a separate, large skillet brown the sausage, breaking it apart as it cooks. Add garlic to onion mixture and saute until fragrant. 


Drain sausage and add to onion mixture along with the Italian seasoning, chicken broth, and spinach. Simmer for 15 minutes.


Add gnocchi, bring to a simmer and cook until gnocchi puff up and start to float (check package for cooking time). Serve warm.


Makes 6 servings.

This is a really easy soup to throw together.  The original recipe contained red bell pepper and was made creamy by adding heavy cream.  I thought about adding the cream, but after I put in the gnocchi, it looked so good the way it was that I skipped it.  I also used frozen spinach instead of fresh, just because it's more convenient.

I used mild sausage in this soup, because that's what we prefer, but if you like things spicy, use your favorite hot sausage.  I also used Penzey's Tuscan Sunset for the Italian seasoning.  The original recipe called for dried basil, but I couldn't find any in my spice cabinet, so that's what I used instead.  

This soup is so good.  My one-year-old couldn't eat it fast enough, and my three-year-old ate all the gnocchi out of it and asked for more.  That was her favorite part because there is a cat named Gnocchi on Curious George. :)

My husband raved about this soup too, so I'm sure I'll be making it again during the long winter.

Heather at The Tasty Gardner made this soup when she was assigned my blog for the Secret Recipe Club in September 2014.  Check out her adaptation: Gnocchi, Meatball, and Spinach Soup.


Pin It

17 October 2011


Continuing on with my fall food extravaganza, here is a lovely pork chop dish for you!  I got this recipe from Cooking Light. This resource, http://www.onlineclasses.net will guide you to cooking and culinary classes when you want to learn more yummy recipes.


Maple-Brined Pork Chops


Ingredients:
3 cups water
1 tbsp black peppercorns
1½ tsp whole allspice
4 garlic cloves, crushed
1 bay leaf, crushed
2 tbsp plus ¼ tsp kosher salt, divided
2½ tbsp real maple syrup, divided
4 pork chops
Cooking spray
2 tbsp butter, melted
2 ripe plums, halved and pitted
2 ripe peaches, halved and pitted


Directions:
Place water, peppercorns, allspice berries, garlic, bay leaf, 2 tbsp salt, and 2 tbsp maple syrup in a pan. Bring to a boil. Cool. Seal pork and brine in a zip-top plastic bag. Chill 8 hours; drain.


Preheat grill to medium-high heat.  Sprinkle pork with ¼ tsp salt. Grill pork on a rack coated with cooking spray 3 minutes on each side or until done. 


Combine 1½ tsp maple syrup and butter; brush onto fruit. Grill fruit, cut sides down, on rack coated with cooking spray for 3 minutes. Cut each peach and plum half in half again; serve with pork. 


Makes 4 servings.


Don't let the name fool you; this isn't one of those sweet meat dishes.  There is maple syrup in the pork chop brine, but the sweetness doesn't come through in the finished dish.  It is very much a savory dish, minus the grilled fruit on top.  I always brine my Thanksgiving turkey but had never brined pork chops before.  I don't know why; it is so easy to do and makes the pork chops crazy moist.  I pulled these pork chops out of the freezer and realized they had been in there since May, but because of the brine they were moist and tender and tasted like I had just brought them home from the store.  The original recipe called for boneless pork, but I used bone-in, since that's what I had and they (obviously) needed to be used up.  The brine would be even more helpful with the boneless pork since it has a tendency to be dry.

The fruit is definitely optional.  I pretty much only did it because I thought it would look pretty for the picture, but my three-year-old loved it.  I served this pork with a special mashed potato dish, but I can't tell you about it yet, because it's a recipe I made for November's Crazy Cooking Challenge.  Come back on November 7th to read about it!


Pin It

14 October 2011


This is a recipe I created for (yet another) blogging challenge.  The good people at Marx Foods sent me samples of five random dry goods that they sell.  The challenge was to create an original recipe using at least two of those foods.  After all the recipes have been posted, the staff at Marx Foods will choose their favorite and that blogger gets a $150 giftcard to their website.  Cool!  This was my first time participating in anything like this, and I have to tell you, it was a little bit intimidating.  As you know if you read my blog regularly, I rarely post recipes that I come up with all by myself.  My recipes are usually ones that I have read in a magazine or seen on tv or on another blog, made, and adapted to my tastes.  I usually need some kind of a starting point and can go from there.  So to have to start from five random ingredients definitely was a challenge for me! Online university degrees in culinary arts are available when you want to further hone your cooking skills.

Two of the food samples I received were coconut sugar and dried De Arbol chiles.  I had never cooked with either one of these ingredients before.  In fact, I had never even heard of coconut sugar before.  I thought maybe it was sugar mixed with coconut or something, but I became educated on the topic when I checked out the website description.  This is what I found out:


"Coconut sugar (aka gula maleka) isn’t coconut flavored sugar. Instead, it is natural sugar made from the sweet sap produced by flower buds on the coconut palm tree. The sap is boiled down into a syrup, then evaporated until it forms granules.

Coconut sugar is an unrefined sugar and a low-glycemic index sugar. It is an uneven light to dark brown color and has a texture similar to brown sugar with large lumps. Coconut sugar’s earthy, nutty, sweet taste is more mild than that of other palm sugars."


How cool is that?  Here is the recipe I came up with using coconut sugar and the dried De Arbol chiles.


Coconut Sugar and Spice Salmon


Ingredients:
4 salmon filets
Olive oil
Salt
2 tbsp coconut sugar
½ tsp ground De Arbol Chiles


Directions:
Preheat oven to 400°.  Line a baking sheet with foil and coat with cooking spray.


Brush salmon filets lightly with olive oil and season lightly with salt.  Place filets on prepared baking sheet.


Combine coconut sugar and ground chiles in a small bowl.  Sprinkle tops of salmon filets with sugar and spice mixture.


Bake for about 10 minutes or until salmon is cooked through and sugar is melted.


Makes 4 servings.

I've mentioned before how I think sweet flavors go well with salmon, so I decided to do a sweet and spicy combo with it.  The combination of the coconut sugar and the ground chiles is so good!  The chiles are pretty spicy (technically labeled as "medium", but pretty hot to me!), so I was kind of worried that the salmon would end up too spicy to eat.  But I was wrong.  The De Arbols gave it the perfect amount of heat and the coconut sugar was the perfect balance to it.  The coconut sugar is not overly coconutty-tasting.  It has just the tiniest hint of coconut essence.  I think it goes really well with salmon.

While not technically part of the recipe, I served this salmon over gaba rice, which was another one of my samples. 

If you think this salmon looks good, leave a comment and tell the fine folks at Marx Foods that they should pick me as the winner! :)


Pin It
Shared at:


I know I've been heavy on the desserts lately, but there was no way I wasn't going to share this one with you.  I saw these on the blog Cookies and Cups and had to make them.  They are blondies filled with tender pieces of apple and toffee bits.


Toffee Apple Blondies


Ingredients:
⅔ cup butter, room temperature
2 cups brown sugar
2 eggs
2 tsp vanilla
2 cups flour
2 tsp baking powder
½ tsp salt
1 cup apple, peeled, cored, and diced (1 large)
½ cup toffee bits


Directions:
Preheat oven to 350°.  Spray a 9×13” baking pan lightly with baking spray.  


Cream butter and brown sugar until smooth.  Add eggs and vanilla and beat until combined.  Add flour, baking powder, and salt. Mix until just combined.  Stir in the chopped apples and toffee bits until evenly distributed.


Spread in prepared pan and bake for 30 minutes until the center is set.


Let cool completely before slicing or frosting.


Makes about 15 bars.

I actually didn't change anything about the recipe.  That's how good they are.  They are soft and tender in the middle and the top gets kind of  flaky and crisp.  So good.  And it's no surprise that toffee and apple go together!

Now, in the interest of full disclosure, I have to tell you that the original recipe included a frosting.  I made the frosting the first time I made these blondies, but not the second time.  The frosting is very rich and there was so much of it that it completely overpowered the blondies.  You couldn't really taste the blondies at all, just the frosting.  I didn't even take pictures of that batch because all you could see was frosting.  So I skipped the frosting the second time around and much preferred them that way.  If I ever do make them with the frosting again, I will only use half the frosting.  Here's the recipe; I've already halved it for you.

Optional Brown Sugar Frosting

Ingredients:
¼ cup butter
½ cup brown sugar
2 tbsp milk
1 cup powdered sugar

Directions:
Melt butter in a medium saucepan. Add brown sugar and milk and bring to a boil. Remove from heat. Let cool for 5 minutes.  Stir in powdered sugar with a whisk.  Let cool until it thickens enough to spread.  Stir before spreading on top of blondies.  Let frosting set for 30 minutes and then cut into bars.

These blondies are a wonderful fall treat.  And a great way to use up all those apples you picked at the orchard!  


Pin It
Shared at:


12 October 2011


This is the final recipe I need to share with you from my husband's special birthday breakfast.  I had to make it again because I wasn't happy with my pictures.  Oh darn!  The recipe is from Claire Robinson.


Maple-Candied Bacon


Ingredients:
1 lb. thick sliced bacon
½ cup real maple syrup
1 tbsp brown mustard


Directions:
Preheat oven to 400°.


Line a rimmed baking sheet with heavy foil. Place a baking rack over the lined sheet tray and spray with nonstick cooking spray.  Arrange the bacon slices across the rack next to each other, not overlapping.


In a small bowl, whisk the maple syrup and mustard. Generously spoon over the top of the bacon, and bake 15 to 20 minutes. Turn the bacon over and baste with syrup mixture. Bake an additional 10 to 15 minutes, or until the bacon has reached desired crispiness.


Carefully remove the pan from the oven. Let the bacon rest on the rack for 5 minutes.


Makes 4 servings, 2 pieces each.


Oh my goodness.  Bacon slathered in maple syrup and baked until gooey and sticky.  Wow.  There's not much else to say about this; it pretty much speaks for itself!

I increased the amount of mustard and used brown instead of Dijon.  I also increased the cooking time.  I definitely recommend using the thick-sliced bacon because the thin stuff (is it just me or is bacon getting thinner all the time?) will burn before the coating sets up.

This isn't how I would make bacon all the time, but it's great for special occasions; a good way to "dress up" breakfast, so to speak.


Pin It

10 October 2011


It's Secret Recipe Club reveal day!  In case you don't know, The Secret Recipe Club is a group of food bloggers who secretly make one of someone else's dishes and post them all on the same day at the same time.  This is my third month participating.  It's really fun, choosing a recipe to make, making the recipe, then reading about everyone else's recipes.  It's a great way to "meet" other bloggers and check out some great blogs that you never knew about before.

This month I was assigned the blog The Cookaholic Wife.  Nichole is a newlywed who likes to cook and write.  She has several recipes on her blog that caught my attention, like her Beef, Mushroom, and Spinach Lasagna, her Chipotle Chicken Burritos, and her Pretzel Crusted Chicken with Cheddar Mustard Sauce.  But in the end, I decided to go with dessert.  How could I see a recipe for Caramel Apple Cream Cheese Bars this time of year and not choose that?

I ended up making some changes to the recipe.  My bars have four layers: a graham cracker crust on the bottom, a cheesecake layer, a layer of spiced apples, and it's finished with a streusel topping.  Then the whole thing is drizzled with caramel sauce.  Are you drooling yet?  Here's the recipe.


Caramel Apple Cheesecake Bars

Ingredients:
1½ cups graham cracker crumbs
6 tbsp butter, melted
2 (8 oz.) pkgs cream cheese, softened
2 eggs
½ cup plus 2 tbsp sugar, divided
1 tsp vanilla
2½ cups apple, peeled, cored, and thinly sliced
1 tsp pumpkin pie spice, divided
½ cup brown sugar
½ cup flour
¼ cup oats
4 tbsp butter
Caramel ice cream topping

Directions:
Preheat the oven to 350°.  Coat an 8x8” baking dish with baking spray.

Combine graham cracker crumbs and melted butter.  Press into the bottom of the baking dish. 

Combine cream cheese, eggs, ½ cup sugar, and vanilla.  Beat until smooth.  Pour over graham cracker crust.

Combine apples, 2 tbsp sugar, and ½ tsp pumpkin pie spice.  Layer apple slices on top of cream cheese mixture.

Combine brown sugar, flour, oats, remaining ½ tsp pumpkin pie spice, and 4 tbsp butter.  Mixture should be crumbly.  Sprinkle on top of the apples.

Bake 30-40 minutes or until center is set and top is golden brown.  Cool before cutting into bars.  Drizzle with caramel sauce.

Makes 9 servings.

Oh man, these bars are so good!  I don't have the equipment to make cheesecake (no springform pan), so making them in bar form is perfect for me.  I love the combination of the creaminess of the cheesecake layer, the tartness and sweetness of the apple layer, and the crunchy streusel on top.  They are the perfect dessert for apple-picking time of year!


Pin It